Framework for Automating SQL Server Reporting Services (SSRS) data driven subscriptions – Part 2

Description: What the goal was to find a way to automate how an end user could subscribe to a SSRS Data Driven Subscription without any intervention from the Business Intelligence Developer. And also enable the end users to have their own selections. And finally if they did not want to receive the report any longer to then delete their subscription.

In Part-2 we will be creating our SSRS Report, creating the Data Driven Subscription and then finally linking this to our Power View Report

Here is the link to Part 1: FRAMEWORK FOR AUTOMATING SQL SERVER REPORTING SERVICES (SSRS) DATA DRIVEN SUBSCRIPTIONS – PART 1

So what we wanted to do, is to create a SQL Server Reporting Services (SSRS) report, then use the data driven subscription (DDS) to email the reports to the people that created the request in the Share Point List. And then finally have a link to a Power View report for more user interaction with their data.

NOTE: This will all be completed on SQL Server 2012

Example:

·         We have our data from our SharePoint List stored in the following table:

o    [dbo].[Mart_TD_SharePoint_ReportSubscriptions]

·         We are going to create a report which will show the Internet Sales.

o    Within this report it will have the Date Range Selected by the User

o    It will also have the Product Line selected by the User.

·         Once the report is created we will then create our Data Driven Subscription.

·         We will also create a Power View report based on the same Cube where our report gets its data from.

o    Once the Power View Report is created we will then add a link to our SSRS report for the users to click on for more information.


Creating our SSRS Report

The first thing that we are going to need to do is to create our SSRS report with the required parameters so that this can be used in our Data Driven Subscription.


As with our Example we will require the following parameters in our report.

·         Start Date

·         End Date

·         Product Line


1.       If need be create a new SSRS Project.

2.       Then as with our example we created our report with the following name:

a.        clip_image001

3.       Next we created our Shared Data Source to our SQL Server Analysis Services (SSAS) cube.

a.        We then added this Shared Data Source to our report.

4.       We are now also going to create another Shared Data Source which will connect to our SQL Server table where we have stored our details for our DDS

a.        NOTE: This will be your SQL Server where you have got your [dbo].[Mart_TD_SharePoint_ReportSubscriptions]

b.       We created the following Shared Data Source as per our example:

                                                               i.      clip_image002

5.       Next we are going to create our 3 Parameters as detailed above:

a.        clip_image003

b.       clip_image004

c.        NOTE: The reason for the above to Parameters that they are set to Text is because we are going to be getting these values later via our DDS, which will then be passed dynamically to our query.

                                                               i.      Along with this, the end user will never use this report due to it being emailed to them.

d.       Also we will be passing the DateKey Values to our MDX Query as explained further in the example.

e.       clip_image005

6.       Next we create our MDX Query

a.        NOTE: Initially we will hard code the values so that we can create our report and test that it works.

b.       So you would create your new Dataset as below:

c.        Here is the MDX Query:

Selectnonempty {[Measures].[Internet Sales Amount]} on 0

,nonempty {(


                  [Date].[Date].&[20070701]:[Date].[Date].&[20070731]

                 ,[Product].[Product Line].&[S]


                 )} on 1

from [Adventure Works]

                                                               i.       

d.       It would look like the following:

                                                               i.      clip_image006

e.       Next click on Fields, and we changed it to the following so that it is more friendly:

                                                               i.      clip_image007

f.         Then click Ok.

7.       We then created our Chart and completed all the formatting in order to get the report looking good.

a.        This is how we put in our values into the Chart:

b.       clip_image008

c.        So once completed the report will look like the following:

d.       clip_image009

8.       The next thing that we are going to do is add our Parameters to our MDX Query

a.        Go into your Data Set you created above: InternetSales_Dates_ProductLine

b.       On the right hand side next to query click on the Function button:

c.         clip_image010

d.       Remove the current MDX query and replace it with the following below:

=“Select non empty {[Measures].[Internet Sales Amount]} on 0 ,non empty {([Date].[Date].&[“+Parameters!StartDateKey.Value+“]:[Date].[Date].&[“+parameters!EndDateKey.Value+“],[Product].[Product Line].&[“+Parameters!ProductLine.Value+“])} on 1 from [Adventure Works]”

                                                               i.       

e.       NOTE: The above must all be on one line otherwise it will not work.

f.         Then click Ok to go back to your report.

9.       Now Preview the report putting in values for the Parameters:

a.        clip_image011

b.       After clicking View Report you should see the following:

c.        clip_image012

10.    Now you can deploy the report to your Reporting Server.

a.        NOTE: Remember to deploy the report as well as the Shared Data Sources.


Configuring and creating your Data Driven Subscription (DDS)

1.       The first thing that you will need to do is to change the data source for your report to use stored credentials.

a.        As with our example we are going to complete the following for our 2 Shared Data Sources from our Report we deployed earlier

                                                               i.      clip_image013

b.       The reason for this is so that when the report runs from the job schedule later, it will be running from a SQL Server Agent job, which will then require a way to be authenticated for the data source.

c.        So this has to be completed before configuring your DDS.

d.       We configured ours to use a Domain account as shown below:

                                                               i.      clip_image014

e.       Then click Test Connection to ensure that it will connect and work:

                                                               i.      clip_image015

f.         Then click Apply to save the changes.

2.       You can now test your report on the report server just to ensure that if you pass the correct parameters it will work.

3.       Next we are going to configure our DDS as explained below:

a.        Click on the arrow next to your report and select Manage as shown below

b.       clip_image016

c.        Then click on Subscriptions

d.       Now click on new Data-driven Subscription

                                                               i.      clip_image017

e.       This will then start the Report Subscription Wizard

f.         On the first screen Step 1 – Create a data-driven subscription: Internet Sales – Report Subscription we configured it with the following:

                                                               i.      clip_image018

                                                              ii.      As you can see from above we gave it a name.

                                                            iii.      We then specified that it will be delivered via email

1.       NOTE: You will have to have configured your SSRS Server to relay email through a server for this option to appear.

                                                            iv.      And finally we specified to use a Shared Data Source.

1.       NOTE: This is what we configured in step 1 above.

                                                              v.      Click Next.

g.        On the Step 2 – Create a data-driven subscription: Internet Sales – Report Subscription we then selected our Shared Data Source:

                                                               i.      clip_image019

                                                              ii.      NOTE: You must select the SQL Server data source connection because in the following step we are going to use a TSQL Query to get our required information.

                                                            iii.      Click Next

h.       On the Step 3 – Create a data-driven subscription: Internet Sales – Report Subscription this is where we use a TSQL Query to pass the details which will be required in the later steps

SELECT 

       [Product Line For Query]

      ,[Email Address]

      ,[StartDateKey]

      ,[EndDateKey]

         ,‘This report Subscription is for Product Line ‘+[Product Line]+‘ and Date Range: ‘+[Date Range]asSubjectDetails

  FROM  [dbo].[Mart_TD_SharePoint_ReportSubscriptions]with (nolock)

                                                               i.       

                                                              ii.      NOTE: You will see that we have put in an extra column so that we can use this as our Subject for our email.

                                                            iii.      Then click on Validate, this will ensure that it can make the connection to the Shared Data Source which you configured in the previous step.

                                                            iv.      clip_image020

                                                             v.      Click Next

i.         Now on the Step 4 – Create a data-driven subscription: Internet Sales – Report Subscription, we are going to configure the sending of the email with the following below:

                                                               i.      To:

1.       This is the to email address

2.       You will change it to Get the value from the database, and select Email Address

a.        clip_image021

                                                              ii.      Subject

1.       This is the subject for your email that is being sent

2.       You will change it to Get the value from the database, and select Subject Details

a.        clip_image022

                                                            iii.      In our example we changed the Include Link to No Value

1.       NOTE: This is because we did not want them to click back to the report that was emailed.

2.       clip_image023

                                                            iv.      Click Next

j.         On the Step 5 – Create a data-driven subscription: Internet Sales – Report Subscription, this is where you configure what parameters will be passed from your query in Step 3 above

                                                               i.      As with our example we configured it with the following:

1.       clip_image024

                                                             ii.      Click Next

k.        On the Step 6 – Create a data-driven subscription: Internet Sales – Report Subscription, this is where you can configure if you want to create a schedule.

                                                               i.      We wanted to create a schedule so that the report would be emailed out

                                                              ii.      clip_image025

                                                            iii.      Click Next

l.         On the final screen Step 7 – Create a data-driven subscription: Internet Sales – Report Subscription, this is where you can configure your schedule which for our requirements we configured it with the following below:

                                                               i.      clip_image026

m.      Then click Finish to complete your Data Driven Report Subscription

                                                               i.      NOTE: If you have not configured your Shared Data Source to use stored credentials you will get the following when you click Finish

                                                             ii.      The current action cannot be completed. The user data source credentials do not meet the requirements to run this report or shared dataset. Either the user data source credentials are not stored in the report server database, or the user data source is configured not to require credentials but the unattended execution account is not specified. (rsInvalidDataSourceCredentialSetting) Get Online Help

                                                            iii.      You will then need to go back and modify the Shared Data Source and then re-create your DDS

n.       You will then see the following:

o.       clip_image027

4.       Now if you want to manually test this and you have access to the SQL Server, you can find the report subscription if you go into your SSRS Server and open the SQL Server Agent, then the Job Activity Monitor

a.        Then the way to find it is to look for the Job Names that start with a GUID

b.       As with our example it had the following name:

                                                               i.      clip_image028

c.        You can also confirm by looking at the Next Run

                                                               i.      clip_image029

                                                              ii.      NOTE: When you create your subscription it will always be for the following day to start.

d.       Right click and select Start Job as Step

                                                               i.      It should complete very quickly and be successful

                                                              ii.      clip_image030

5.       Now if you go and check your email you should see the following below:

a.        NOTE: For our subscription we had selected the following

                                                               i.      Date Range: July 2007 – June 2008

                                                             ii.      Product Line: Mountain

b.       clip_image031

c.        Which as you can see from above we received.


Creating the Power View Report and putting the link into the SSRS Report

1.       We then went ahead and created our Power View report which connected to our SSAS Cube and looked like the following:

a.        clip_image033

b.       NOTE: This is before we put in any filters to only show our selection from our report.

2.       Next we went back into our SSRS report and put in the following below so that we can use it as a Hyperlink in our report

a.        Then in the bottom of the report right click and select Insert and then Text Box

b.       clip_image034

c.        Double click in the Textbox or within your table so that it is highlighted.

                                                               i.      Then right click and select Create Placeholder

                                                              ii.      clip_image035

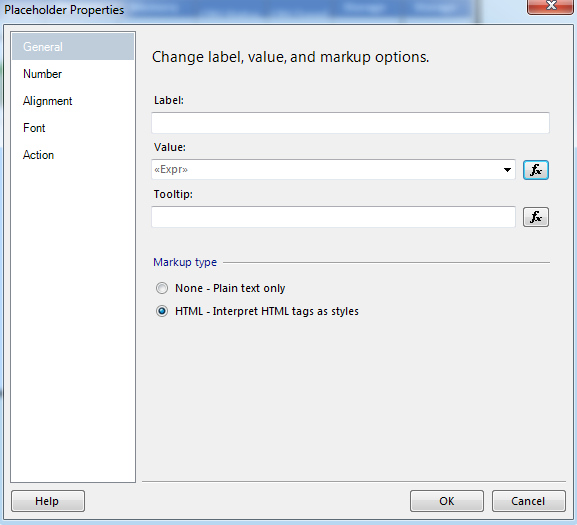
                                                            iii.      Now this will open the Placeholder Properties

                                                            iv.      In the General Window you first need to put in your text or expression into the Value area.

1.       Click on the function button

2.       As with our example we put in the following below.

3.       You will see that we have already formatted it with our HTML Tags

=“<a href=””http://powerviewServer/powerpivot/_layouts/15/ReportServer/AdHocReportDesigner.aspx?RelativeReportUrl=/powerpivot/Shared%20Documents/Adventure%20Works%20DW%202012/Report%20Subscription%20-%20Adventure%20Works.rdlx&ViewMode=Presentation&PreviewBar=False&rf=[Product].[Product%20Line]%20eq%20%27Mountain%27 “”>Click HERE to view more information</a>”

                                                              v.      From the above example we have set the Preview Bar to false so that when people are viewing the report, they can only view the report and not make any changes.

1.       It is highlighted above in RED

2.       &PreviewBar=False

                                                            vi.      From the above example we have hardcoded our Filter above with Mountain

1.       It is highlighted in Purple

2.       &rf=[Product].[Product%20Line]%20eq%20%27Mountain%27

                                                           vii.      Now what we will do is to replace the hardcodes value with our value from our query, which is shown below:

&rf=[Product].[Product%20Line]%20eq%20%27″+First(Fields!Product_Line.Value, “InternetSales_Dates_ProductLine”)+”%27

                                                         viii.      So now the entire HTML Tag from above will look like the following:

=“<a href=””http://powerview2013dev/powerpivot/_layouts/15/ReportServer/AdHocReportDesigner.aspx?RelativeReportUrl=/powerpivot/Shared%20Documents/Adventure%20Works%20DW%202012/Report%20Subscription%20-%20Adventure%20Works.rdlx&ViewMode=Presentation&PreviewBar=False&rf=%5BProduct%5D.%5BProduct%20Line%5D%20eq%20%27&#8221;+First(Fields!Product_Line.Value, “InternetSales_Dates_ProductLine”)+“%27 “”>Click HERE to view more information</a>”

                                                            ix.      Once you have formatted your expression with your HTML tags then click Ok.

d.       The final part is to enable your Placeholder for HTML.

                                                               i.      Under Markup Type click on HTML – Interpret HTML tags as styles

                                                              ii.      clip_image036

                                                            iii.      Then click Ok.

e.       It should now look like the following:

                                                               i.      clip_image037

3.       Once the report is run or emailed it will then look like this at the bottom of the report:

a.        clip_image038

4.       Finally deploy your changes to your report server.

5.       Then to test to make sure it works correctly, run the job again as explained above.

a.        Once you get the email, as with our example we had selected Mountain.

b.       After clicking the above link to view more information we saw the following Power View Report.

c.        clip_image040


Framework for Automating SQL Server Reporting Services (SSRS) data driven subscriptions – Part 1

Description: What the goal was to find a way to automate how an end user could subscribe to a SSRS Data Driven Subscription without any intervention from the Business Intelligence Developer. And also enable the end users to have their own selections. And finally if they did not want to receive the report any longer to then delete their subscription.

In Part 1 we will be creating the SharePoint List, and using SQL Server Integration Services to get the data into our table.

·         What we will be doing below is to first create a SharePoint List

o    NOTE: This is created on SharePoint 2013

§  And for SSIS we will be using SQL Server 2012

·         Then we will use SSIS and a new Data Flow Task to get the data out of our SharePoint List and put this into a SQL server table.

·         After which we will then transform some of the data and then store it in a Dimension table.

o    This dimension table will then be used later in a SSRS Data Driven subscription so that we can email the report out.


Example for documentation:

·         We are going to create our List on SharePoint 2013

o    Within our List we are going to have the following fields:

§  Subscription Name

§  Date Range

·         We will specify custom Date Ranges

§  Product Line

·         We will pre-populate the Product Line list

§  Email Address

·         All the above information will be coming from the AdventureWorks2012DW SQL Database


You can get a copy of this here: http://msftdbprodsamples.codeplex.com/releases/view/55330

·         I used the AdventureWorksDW2012 Data File and AdventureWorks Multidimensional Models SQL Server 2012


Creating SharePoint 2013 List

1.       In your SharePoint 2013 website click on the Site Contents:

a.        clip_image001

2.       Then click on add an app

a.        clip_image002

3.       Then click on Custom List, this is so that we can create our own Custom List

a.        clip_image003

4.       This will bring up the Adding Custom List Window

a.        As with our example we created the following Custom List Name:

                                                               i.      clip_image004

b.       ClickCreate

5.       Now click on your Custom List you created to go into your Custom List

a.        clip_image005

6.       Now at the ribbon on the top click on List and then List Settings on the right hand side

a.        clip_image006

b.       This will then take you to the List Settings

7.       As per our Example explained above we are going to be creating the following columns detailed below by doing the following.

8.       Under Columns click on Create column:

a.        clip_image007

b.       First we created our Subscription Name by clicking on Title and changing it to the following:

                                                               i.      clip_image008

                                                              ii.      Click Ok to create the column

c.        Click on Create Column again to create the Date Range.

                                                               i.      NOTE: We are going to create names for our Date Range which we will convert to actual dates when we insert the data in SSIS in the later steps.

1.       The choices we are going to create are the following due our data having actual data from July 2007 to June 2008

2.       Ranges:

a.        July 2007

b.       July 2007 – December 2007

c.        July 2007 – June 2008

3.       clip_image010

4.       Click Ok to create

d.       Click Create column again for the Product Line.

                                                               i.      Once again it will be a choice of the following:

1.       Accessory

2.       Mountain

3.       Road

4.       Touring

                                                              ii.      clip_image012

                                                            iii.      Click Ok to Create

e.       The final column to be created is the Email Address column as shown below:

                                                               i.      clip_image013

                                                              ii.      Click Ok to Create.

9.       So once completed you will see the following:

a.        clip_image014

10.    Next we will use SSIS to bring the data down into a SQL Table.


Downloading and installing the SSIS component to query data from SharePoint Lists

1.       Click on this link below and download the following:

a.        http://sqlsrvintegrationsrv.codeplex.com/releases/view/17652

2.       clip_image015

3.       Once it has been downloaded, you can run the MSI and complete the steps.

a.        NOTE: You will have to close down and open up your BIDS (Business Intelligence Development Studio) or SSDT (SQL Server Data Tools) in order to see the SharePoint List data.             


Creating the SSIS Package to get the data from the SharePoint list into a SQL Server Table.

1.       Create a new SSIS Package and give it an appropriate name.

a.        As with our example we named it the following:

b.       clip_image016

2.       The next thing that you need to do is to create a connection to your SharePoint Server by doing the following:

a.        Right click on the Connection Managers and select New Connection.

b.       Scroll down and select the following:

                                                               i.      clip_image017

c.        Then click Add which will bring up the SharePoint Credential Connection Manager Editor.

d.       As with our example we put in the following:

                                                               i.      clip_image018

                                                              ii.      NOTE: Make sure that the SQL Server Agent Job service account has the permissions to SharePoint.

1.       Alternatively use a Custom Credential which will require access to the SharePoint List.

2.       In our environment we have got a domain account who’s password does not change that we use.

3.       Next drag in a Data Flow Task and as with our example we gave it the following name:

a.        clip_image019

4.       Now go into your Data Flow Task and configure it with the following:

a.        Click in the SSIS Toolbox and under Common you will see your SharePoint List Source

                                                               i.      clip_image020

b.       Drag this into your Data Flow Task and configure it with the following:

                                                               i.      Double click to go into the Properties

                                                              ii.      On the connection Managers Window you have to select your connection Manager:

1.       clip_image021

                                                            iii.      Then click on the Component Properties and put in the following:

1.       clip_image022

a.        This is so that it will look for all the SharePoint Lists

2.       clip_image023

a.        This will be the actual Root of your SharePoint location

b.       NOTE: It must NOT be the actual URL To your list, if you do this it will not find the List.

3.       Then scroll up to the Site List Name and in here you will put your List that you created above.

a.        As shown below is our example:

b.       clip_image024

                                                            iv.      Now click on Column Mappings and if the above settings are correct you should see all the columns as shown below:

                                                              v.      clip_image025

c.        Then click Ok to complete your SharePoint List Source

5.       Next is to create the destination and for this you need to create your destination table first.

6.       Below is the scripted out table that we used:

CREATETABLE[dbo].[Staging_tb_SharePointList](

       [ID][int]NOTNULL,

       [Date Range][nvarchar](255)NOTNULL,

       [Product Line][nvarchar](255)NOTNULL,

       [Email Address][nvarchar](255)NOTNULL,

       [Subscription Name (LinkTitle)][nvarchar](255)NOTNULL,

       [Subscription Name (Title)][nvarchar](255)NOTNULL,

       [Subscription Name (LinkTitleNoMenu)][nvarchar](255)NOTNULL,

       [ContentType][nvarchar](255)NOTNULL,

       [Modified][datetime]NOTNULL,

       [Created][datetime]NOTNULL,

       [CreatedBy][nvarchar](255)NOTNULL,

       [ModifiedBy][nvarchar](255)NOTNULL,

       [Version][nvarchar](255)NOTNULL,

       [Attachments][int]NOTNULL,

       [Edit][nvarchar](255)NOTNULL,

       [Type][nvarchar](255)NOTNULL,

       [ItemChildCount][nvarchar](255)NOTNULL,

       [FolderChildCount][nvarchar](255)NOTNULL,

       [AppCreatedBy][nvarchar](255)NOTNULL,

       [App Modified By][nvarchar](255)NOTNULL,

 CONSTRAINT[PK_Staging_tb_SharePointList]PRIMARYKEYCLUSTERED

(

       [Created]ASC

)WITH (PAD_INDEX=OFF,STATISTICS_NORECOMPUTE=OFF,IGNORE_DUP_KEY=OFF,ALLOW_ROW_LOCKS=ON,ALLOW_PAGE_LOCKS=ON)ON[PRIMARY]

)ON[PRIMARY]


GO

a.        NOTE: Some of the columns from the source might be set to nvarchar(4000) but I know that we would not have anything this long so we left them all at 255 to save space.

7.       Next we dragged in our OLE DB Destination:

a.        NOTE: You would have to have created a Connection to your Destination Database

b.       clip_image026

c.        As you can see we configured it with the following:

                                                               i.      clip_image027

d.       And mapped the columns as required.

                                                               i.      NOTE: Ensure that all the mappings are correct

8.       Once done it should look like the following:

a.        clip_image028

b.       As noted above the reason for the warning is due to some columns from the source having nvarchar(4000)

9.       Now the final step is to run it and see if it works as expected

a.        But before doing this first add an item to the list:

b.       clip_image029

c.        ClickSave

10.   Now run your data flow task and you should hopefully see 1 row transferred

a.        clip_image030


Creating the Stored Procedure to insert the data into the Dimension (storage table) – To be used in Data Driven Subscription

Below is the Stored Procedure (SP) so that we can store the details from the SharePoint List and create some additional column.

The destination table will also be used later in the Reporting Services data driven subscription.


1.       Below is the SP which you can use to create your SP.

a.        NOTE: You will have to first create the destination table, which you can complete within the SP.

USE[AdventureWorksDW2012]

GO

/****** Object:  StoredProcedure [dbo].[prc_LoadDIM_Mart_TD_SharePoint_ReportSubscription]    Script Date: 2014-04-23 07:50:25 AM ******/

SETANSI_NULLSON

GO

SETQUOTED_IDENTIFIERON

GO


— ===============================================================================================================

— Disclaimer

— The sample scripts are provided AS IS without warranty of any kind.

— I further disclaims all implied warranties including, without limitation, any implied warranties of

— merchantability or of fitness for a particular purpose. The entire risk arising out of the use or performance

— of the sample scripts and documentation remains with you.

— In no event shall I, its authors, or anyone else involved in the creation, production, or delivery of

— the scripts be liable for any damages whatsoever (including, without limitation, damages for loss of business

— profits, business interruption, loss of business information, or other pecuniary loss) arising out of the use

— of or inability to use the sample scripts or documentation, even if Microsoft has been advised of the

— possibility of such damages.

— ===============================================================================================================


— ===============================================================================================================

— Author:           Gilbertq

— Create date: 16 Apr 2014

— Description:      Here we are going to Define our Start and End Dates for our selection

—              from our SharePoint List

— NOTE: The format of the Start and End Dates are going to be the DateKey

—       from our Date Table so that this can be passed to our SSAS

—       AdventureWorksDW2012 cube.

— ===============================================================================================================

ALTERPROCEDURE[dbo].[prc_LoadDIM_Mart_TD_SharePoint_ReportSubscription]


AS

BEGIN


       SETNOCOUNTON;


— ===========================================================================

— 1. Getting the DateKey for our Selection: 01 July 2007

— ===========================================================================

Declare@Selection_StartJuly2007asInt

Set@Selection_StartJuly2007= 20070701


— ===========================================================================

— 2. Getting the DateKey for our Selection: 31 July 2007

— ===========================================================================

Declare@Selection_EndJuly2007asInt

Set@Selection_EndJuly2007= 20070731


— ===========================================================================

–3. Getting the DateKey for our Selection: December 2007

— ===========================================================================

Declare@Selection_December2007asInt

Set@Selection_December2007= 20071231


— ===========================================================================

–4. Getting the DateKey for our Selection: June 2008

— ===========================================================================

Declare@Selection_June2008asInt

Set@Selection_June2008= 20080630


— ===========================================================================

— Below is the query to either update an existing Subscription or if new

— then insert into the table

— ===========================================================================


 Merge[dbo].Mart_TD_SharePoint_ReportSubscriptionsas[Dest]

       Using (

                     SELECT   [ID]

                                  ,[Date Range]

                                  ,[Product Line]

                                  ,Casewhen[Product Line]=‘Accessory’then‘S’

                                        when[Product Line]=‘Mountain’then‘M’

                                           when[Product Line]=‘Road’then‘R’

                                           when[Product Line]=‘Touring’then‘T’

                                           Endas[Product Line For Query]

                                  ,[Email Address]

                                  ,[Subscription Name (Title)]

                                  ,[Modified]

                                  ,[Created]

                                  ,[CreatedBy]

                                  ,[ModifiedBy]

                                  ,Casewhen[Date Range]=‘July 2007’Then@Selection_StartJuly2007

                                         when[Date Range]=‘July 2007 – December 2007’Then@Selection_StartJuly2007

                                         when[Date Range]=‘July 2007 – June 2008’Then@Selection_StartJuly2007

                                         EndasStartDateKey

                                  ,Casewhen[Date Range]=‘July 2007’Then@Selection_EndJuly2007

                                         when[Date Range]=‘July 2007 – December 2007’Then@Selection_December2007

                                         when[Date Range]=‘July 2007 – June 2008’Then@Selection_June2008

                                         EndasEndDateKey


                           FROM[AdventureWorksDW2012].[dbo].[Staging_tb_SharePointList]with (nolock)                    


              )as[Source]

       On[Dest].[ID]=[Source].[ID]

       and[Dest].[Email Address]=[Source].[Email Address]

       and[Dest].[Subscription Name (Title)]=[Source].[Subscription Name (Title)]

       WhenMatched

       ThenUpdateSet

                [Dest].[ID]=Source.[ID]

               ,[Dest].[Date Range]=Source.[Date Range]

               ,[Dest].[Email Address]=Source.[Email Address]

               ,[Dest].[Subscription Name (Title)]=Source.[Subscription Name (Title)]

               ,[Dest].[Modified]=Source.[Modified]

               ,[Dest].[Created]=Source.[Created]

               ,[Dest].[CreatedBy]=Source.[CreatedBy]

               ,[Dest].[ModifiedBy]=Source.[ModifiedBy]

               ,[Dest].StartDateKey=Source.StartDateKey

               ,[Dest].EndDateKey=Source.EndDateKey

               ,[Dest].[Product Line]=Source.[Product Line]

               ,[Dest].[Product Line For Query]=Source.[Product Line For Query]

       WhenNotMatchedbyTargetthenInsert (

                [ID]

               ,[Date Range]

               ,[Email Address]

               ,[Subscription Name (Title)]

               ,[Modified]

               ,[Created]

               ,[CreatedBy]

               ,[ModifiedBy]

               ,StartDateKey

               ,EndDateKey 

               ,[Product Line]

               ,[Product Line For Query]


        )Values (

                Source.[ID]

               ,Source.[Date Range]

               ,Source.[Email Address]

               ,Source.[Subscription Name (Title)]

               ,Source.[Modified]

               ,Source.[Created]

               ,Source.[CreatedBy]

               ,Source.[ModifiedBy]

               ,Source.StartDateKey

               ,Source.EndDateKey

               ,Source.[Product Line]

               ,Source.[Product Line For Query]

              )

       WhenNotMatchedBySource

              ThenDelete

       ;


       SETNOCOUNTOFF;

END

b.        

c.        With the above SP the reason for creating the StartDateKey and EndDateKey variables is due to our choice in the SharePoint list:

                                                               i.      clip_image031

                                                              ii.      And the above correlates to our variables in the SP.

                                                            iii.      NOTE: The StartDateKey and EndDateKey will be used later in the SQL Server Reporting Services (SSRS) Data Driven subscription, which in turn will pass the information to the SSRS Report Parameters

d.       We also had to put in a Case statement for the Product Line For Query so that it would match the underlying values in our SSAS dimension

e.       Another thing that we did do is to validate the email address to ensure that there are no bogus email addresses.

2.       So this is what the table will look like with the query for the Data Driven Subscription

3.       clip_image032


The next steps will be in the Reporting Services quick wins document where we will explain how we create our report with the require parameters.

After which we then create our Data Driven subscription

And then finally create our Power View Report and pass this link with the filter in our SSRS report.


SSIS – Creating new Partitions in SQL Server Analysis Services (SSAS) with XMLA and Analysis Services DDL

What I wanted to do is to create a process in SSIS that did not use code to create new SSAS Partitions using XMLA.


NOTE: This is quite a long blog post, but it has all the details from start to finish to get this completed.


Example:

·         We will be using the AdventureWorks2012DW data warehouse and Cube.

·         We will be creating new Partitions starting from 01 Jan 2010 on our Internet Sales Measure Group.

o    When creating our Partitions we will be using the query binding because our underlying SQL Server Table will be partitioned by DateKey.

§  NOTE: Our SQL Server Table would also have a Clustered Index created on the DateKey.

o    For our query in Analysis Services Partition we will be using the first day and the last day of the month in order to get our required data into our Partition.

o    Along with this when we create our Partition we will also use the Slice Function to further help Analysis Services query the data as quickly as possible.

o    So our Start Datekey will be 20100101

o    And our End DateKey will be 20100131

·         Our Partitioning naming scheme will be the Measure group name and year and month

o    So for our example it will be Internet Sales 2010-01


You can get a copy of this here: http://msftdbprodsamples.codeplex.com/releases/view/55330

·         I used the AdventureWorksDW2012 Data File and AdventureWorks Multidimensional Models SQL Server 2012


Creating our Partitioned Table and starting point.

Below are the steps where we will create our table and our starting point for our example above.


1.       Below is the script that we will use on our AdventureWorksDW2012 SQL Server database which will be explained below:

— =======================================================================

— 1. This will create our Table

— =======================================================================

CREATETABLE[dbo].[Mart_TD_Max_SSAS_PartitionDetails](

       [YearOfLastPartition][int]NOTNULL,

       [MonthNameOfLastPartition][varchar](30)NOTNULL,

       [YearMonthOfLastPartition][varchar](30)NOTNULL,

       [DateTimeInsertedIntoTable][datetime]NOTNULL,

       [PartitionName][varchar](300)NOTNULL,

       [SSAS_DatabaseName][varchar](300)NOTNULL

)ON[PRIMARY]


GO


— =======================================================================

— 2. Then we insert our starting point into our Partitioned Table

— =======================================================================

Insertinto[dbo].[Mart_TD_Max_SSAS_PartitionDetails]

Select 2009 as[YearOfLastPartition]

      ,‘December’as[MonthNameOfLastPartition]

      ,‘2009-12’as[YearMonthOfLastPartition]

      ,getdate()as[DateTimeInsertedIntoTable]

      ,‘Internet Sales – 2009-12’[PartitionName]

      ,‘Adventure Works’as[SSAS_DatabaseName]


— =======================================================================

— 3. Then we do a select to ensure that the details inserted are correct

— =======================================================================

Select*

from[dbo].[Mart_TD_Max_SSAS_PartitionDetails]

a.        As you can see above in Section 1 is where we are creating our table.

b.       In Section 2 is where we are inserting the data which is easier to explain:

                                                               i.      clip_image001

                                                              ii.      NOTE: We will be using the above columns to generate our requirements for when creating our next partition.

1.       Which you can view here in section later in the document.

                                                            iii.      As you can see above because we want our next partition to be for Jan 2010, we need to start our details one month earlier. EG; December 2009


Getting details from a stored procedure to be used in SSIS to create our next partition

In the steps below we are going to show the stored procedure and explain how we get our details for our next partition.

We will then use these details and in the next step put this all into SSIS to create our partition.


1.       Below is the entire script and each section is explained in the comments section

a.        NOTE: A quick overview is that based on the information in the Mart_TD_Max_SSAS_PartitionDetails, we are getting the next month’s values for the following:

                                                               i.      Our Start and End DateKeys, Year Month for the Partition Name, as well as the year and Month name which are used in the proc.

b.       clip_image002

USE[AdventureWorksDW2012]

GO


/****** Object:  StoredProcedure [dbo].[prc_GetNextPartitionValues_ForSSAS_SQL]    Script Date: 2014-04-09 10:46:59 AM ******/

SETANSI_NULLSON

GO


SETQUOTED_IDENTIFIERON

GO


— ===============================================================================================================

— Disclaimer

— The sample scripts are provided AS IS without warranty of any kind.

— I further disclaims all implied warranties including, without limitation, any implied warranties of

— merchantability or of fitness for a particular purpose. The entire risk arising out of the use or performance

— of the sample scripts and documentation remains with you.

— In no event shall I, its authors, or anyone else involved in the creation, production, or delivery of

— the scripts be liable for any damages whatsoever (including, without limitation, damages for loss of business

— profits, business interruption, loss of business information, or other pecuniary loss) arising out of the use

— of or inability to use the sample scripts or documentation, even if Microsoft has been advised of the

— possibility of such damages.

— ===============================================================================================================


— ===============================================================================================================

— Author:       Gilbertq

— Create date: 09 Apr 2014

— Description:  This is where we get the data from the Current or Last Partition and then get into variables

—              the next partition values to create the SSAS Partitions and SQL Partitions if required in SSIS

— ===============================================================================================================

CREATEPROCEDURE[dbo].[prc_GetNextPartitionValues_ForSSAS_SQL]


AS

BEGIN


   SETNOCOUNTON;


— ==================================================================================================================

— 1. We are getting the Year Value of the last partition that was created from Mart_TD_Max_SSAS_PartitionDetails

— ==================================================================================================================

Declare@YearOfLastPartitionasInt

Set@YearOfLastPartition=

   (

          SelectYearOfLastPartition

          from[dbo].[Mart_TD_Max_SSAS_PartitionDetails]with (nolock)

   )


— ====================================================================================================================

— 2. We are getting the Month Name Value of the last partition that was created from Mart_TD_Max_SSAS_PartitionDetails

— ====================================================================================================================

Declare@MonthNameOfLastPartitionasvarchar(30)

Set@MonthNameOfLastPartition=

   (

          SelectMonthNameOfLastPartition

          from[dbo].[Mart_TD_Max_SSAS_PartitionDetails]with (nolock)

   )


— ====================================================================================================================

— 3. Here we are getting the Actual Date from our previous values so that it can be used in the next steps.

—    Below we are always getting the last day of the month for our current values.

— ====================================================================================================================

Declare@MaxDateForCurrentPartitionasDate

Set@MaxDateForCurrentPartition=

   (

          Selecttop 1 [FullDateAlternateKey]

          fromDimDatewith (nolock)

          whereCalendarYear=@YearOfLastPartition

          and[EnglishMonthName]=@MonthNameOfLastPartition

          orderby[DayNumberOfMonth]desc

   )


— ====================================================================================================================

— 4. Now here we are getting the next date value, which will be the first day of the Next Month

— ====================================================================================================================

Declare@MaxDateForNextPartitionasint

Set@MaxDateForNextPartition=

   (

          SelectDateKey

          fromDimDatewith (nolock)

          where[FullDateAlternateKey]=DATEADD(Day,1,@MaxDateForCurrentPartition)

   )


— ====================================================================================================================

— 5. Next we are getting the Year value for our Next Month’s value

— ====================================================================================================================

Declare@YearForNextPartitionasint

Set@YearForNextPartition=

   (

          SelectCalendarYear

          fromDimDatewith (nolock)

          whereDateKey=@MaxDateForNextPartition

   )


— ====================================================================================================================

— 6. Next we are getting the Month Name value for our Next Month’s value

— ====================================================================================================================

Declare@MonthNameForNextPartitionasvarchar(30)

Set@MonthNameForNextPartition=

   (

          Select[EnglishMonthName]

          fromDimDatewith (nolock)

          whereDateKey=@MaxDateForNextPartition

   )


— ====================================================================================================================

— 7. Next we are getting the first day of Next Month’s value

— ====================================================================================================================

Declare@StartDateKeyForNextPartitionasInt

Set@StartDateKeyForNextPartition=

   (     

          Selecttop 1 DateKey

          fromDimDatewith (nolock)

          whereCalendarYear=@YearForNextPartition

          and[EnglishMonthName]=@MonthNameForNextPartition

          orderby[DayNumberOfMonth]

   )


— ====================================================================================================================

— 8. Next we are getting the last day of Next Month’s value

— ====================================================================================================================

Declare@EndDateKeyForNextPartitionasINt

Set@EndDateKeyForNextPartition=

   (

          Selecttop 1 DateKey

          fromDimDatewith (nolock)

          whereCalendarYear=@YearForNextPartition

          and[EnglishMonthName]=@MonthNameForNextPartition

          orderby[DayNumberOfMonth]desc

   )


— ====================================================================================================================

— 9. Next we are getting the Year Month Value for Next Month’s Partition

— ====================================================================================================================

Declare@YearMonthForNextPartitionasvarchar(30)

Set@YearMonthForNextPartition=

   (

          Selecttop 1 convert(Varchar(4),CalendarYear)+‘-‘+RIGHT(REPLICATE(‘0’,5)+CONVERT(VARCHAR(2),MonthnumberofYear),2)

          fromDimDatewith (nolock)

          whereCalendarYear=@YearForNextPartition

          and[EnglishMonthName]=@MonthNameForNextPartition

   )


— ====================================================================================================================

— 12. And finally we are getting our 3 values for Next month which we can then use in our SSIS package for multiple

—     loads

— ====================================================================================================================

Select

           @StartDateKeyForNextPartitionasStartDateKeyForNextPartition

          ,@EndDateKeyForNextPartitionasEndDateKeyForNextPartition

          ,@YearMonthForNextPartitionasYearMonthForNextPartition

          ,@YearForNextPartitionasYearForNextPartition

          ,@MonthNameForNextPartitionasMonthNameForNextPartition


   SETNOCOUNTOFF;

END


GO

2.       Run this against your SQL Server AdventureWorksDW2012 database.


SSIS to create new Partitions for SSAS

In the steps below we will use SSIS to create our new Partitions for our SSAS Cube.


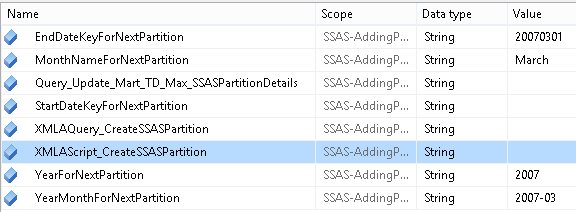
1.       The first thing to do is to create the following variables which will be used for our entire SSIS Package:

a.        clip_image003

b.       NOTE: The reason that I set them all to the Data type of string is so that when they are used later in the expressions we do not have to cast the values.

                                                               i.      This is because all our expressions will either be passed to SQL server or Analysis Services which only accepts it in a string format.

                                                              ii.      We also put in defaults so that when we Evaluate the Expressions later we can see values.

2.       Next we are going to get all our variables for our stored procedure above and put them into the above variables.

a.        Drag in your Execute SQL task and as with our example we gave it the following name:

Get Variables for Next Months SSAS Partition for Internet Sales

b.       Next right click and select Properties.

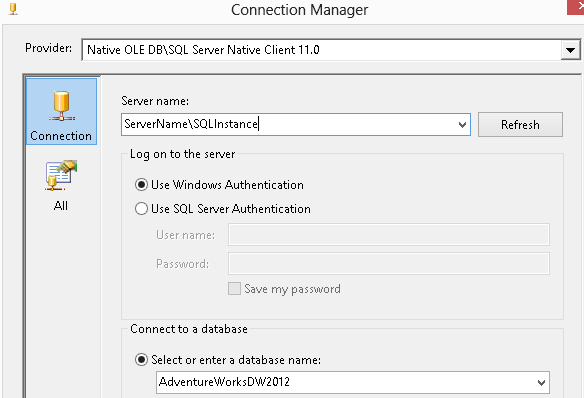
c.        You will have to create your OLE DB connection to your SQL server where you have your AdventureWorksDW2012 database.

                                                               i.      clip_image004

d.       Then configure the General window with the following as shown below:

                                                               i.      clip_image005

e.       Then click on the Result Set on the left hand side and configure it with the following to map our variables from our Stored Procedure to our Variables in SSIS

                                                               i.      clip_image006

                                                              ii.      NOTE: All of the above will be used in different sections throughout the SSIS Package.

f.        Click Ok.

g.        Then right click and select Execute Task, to test that it runs correctly.

                                                               i.      You should see the following below:

                                                              ii.      clip_image007

3.       Now in the following steps I am going to explain how initially to manually create our Partition so that we can then use this for our SSIS in the next step.

a.        Log into your SSAS Server and go into the Measure Group and then Partition where you want to automate your partition creating.

b.       NOTE: As with our example we are going to create a new Partition on the Internet Sales Measure Group for December 2009

                                                               i.      clip_image008

c.        Right click on Partitions and select New Partition, this will open the Partition Wizard.

                                                               i.      We selected the Internet Sales Facts table as shown below and clicked Next

1.       clip_image009

                                                              ii.      On the Restrict Rows we selected Specify a query to restrict rows

1.       NOTE: We are doing this due to wanting to specify and our start and end DateKey

2.       clip_image010

3.       We then scrolled to the end of the Query and put in the following as per our example

a.        clip_image011

                                                            iii.      We accepted the defaults until we got to the final window. And put in the details below.

1.       clip_image012

                                                            iv.      We then clicked Finish.

d.       You will now see the partition we created

                                                               i.      clip_image013

4.       Next is where we are going to script out our Partition so that we can then use this within SSIS

a.        Right click on the partition we created above and select Script Partition as, Create To, New Query Editor Window.

                                                               i.      clip_image014

                                                              ii.      You should see the following below which is not the complete script

1.       clip_image016

b.       Next you will first have to do a find and replace on all the double quotation so that it can be escaped in SSIS.

                                                               i.      Press Control+H and complete the following below:

1.       clip_image017

                                                              ii.      Then click Replace All.

c.        If you have any singles quotes in your Query Definition you will also have to change them to have 2 single quotes so that when this is parsed by TSQL it will work.

                                                               i.      So as with our above example we also had to change the following from:

1.  + ‘Line ‘  +

2.       To: + ”Line ”  +

d.       Now open a TSQL Query and first put in the following:

SelectasXMLAScript_CreateSSASPartition

                                                               i.      Then take your XMLA script from above and insert it in between the single quotes above.

                                                              ii.      Now run the TSQL Select to ensure that it will run successfully

1.       clip_image018

                                                            iii.      NOTE: The reason that we parse this in TSQL is so that in SSIS we can then put in our variables as required.

e.       Now take the entire TSQL statement from step 4c above and copy it.

f.         Now go back into SSIS and open your variables.

                                                               i.      Where it has the variable name of XMLAQuery_CreateSSASPartition click on the Ellipses under Expression

                                                              ii.      Then in the Expression Window put in a double quote at the start and insert your TSQL query from step 4d above:

1.       clip_image019

                                                            iii.      Then scroll right to the end and put in another double quote at the end

1.       clip_image020

                                                            iv.      Then click on Evaluate Expression to ensure that so far it is all correct.

g.        Now the final part in creating our script is to put in the required variables.

                                                               i.      The first section where we are going to add the variables is for the ID and name of our partition.

                                                              ii.      As with our example we put in the following:

1.       What it looked like before the change:

<ID>Fact Internet Sales 2009-12</ID>

<Name>Fact Internet Sales 2009-12</Name>

2.       And what it was with the variables inserted:

<ID>Fact Internet Sales “+ @[User::YearMonthForNextPartition]  +”</ID>

<Name>Fact Internet Sales “+ @[User::YearMonthForNextPartition]  +”</Name>

                                                            iii.      In the next section we are going to put in our Start and end DateKey’s for our Query Definition

1.       What it looked like before the change:

WHERE orderdatekey between 20091201 and 20091231</QueryDefinition>

2.       And what it looked like after the change:

WHERE orderdatekey between “+ @[User::StartDateKeyForNextPartition]  +” and “+ @[User::EndDateKeyForNextPartition]  +”</QueryDefinition>

                                                            iv.      Now what we are going to add is our Slice Property to our Partition.

1.       So after the section below is where you will put in the Slice Property

<ProcessingMode>Regular</ProcessingMode>

2.       As you can see we have put in the Slice Property with the variables already inserted:

<ProcessingMode>Regular</ProcessingMode>

<Slice>{[Date].[Date].&amp;[“+ @[User::StartDateKeyForNextPartition]  +”],[Date].[Date].&amp;[“+ @[User::EndDateKeyForNextPartition]  +”]}</Slice>

                                                              v.      Now click on Evaluate Expression to ensure that everything is correct.

1.       If you scroll down you should see the following

a.        clip_image021

b.       NOTE: This was due to us creating the values for our variables in Step 1 above.

5.       Next we are going to be taking our script which has been populated with the details above and put this into a variable which can then be passed to our Analysis Services Execute DDL Task.

a.        Drag in an Execute SQL Task.

b.       We then gave it the following name:

                                                               i.      Get XMLA for SSAS to create new Partition

c.        Next right click and go into the Properties and configure it with the following as shown below:

                                                               i.      clip_image022

                                                              ii.      NOTE: As you can see above we are using the variable which we populated with our XMLA script in step 4 above.

                                                            iii.      We are also setting the Result Set to a Single row. This is so that we can populate our XMLA Script which will then be passed to Analysis Services.

1.       Just to ensure the understanding is that this Execute SQL Task will populate our XMLAQuery_CreateSSASPartition variable with the details.

2.       After which we want the output to be inserted into our XMLA Script which will then be used in Analysis Services.

d.       Now click on Result Set and configure it with the following below:

                                                               i.       Click On Add and select the following:

                                                              ii.      clip_image023

e.       Then Click Ok.

6.       Next we will need to configure our Analysis Services Execute DDL Task with the following steps below.

a.        Drag in the Analysis Services Execute DDL Task

b.       Right click and select Properties to go into the Properties.

c.        Under Name we gave it the following name as per our Example:

                                                               i.      Run XMLA Script to create new SSAS Partition

d.       Then click on DDL.

                                                               i.      In the right hand side where it says Connection you are going to have to create a connection to your SSAS, and Database

                                                              ii.      Click on New Connection

                                                            iii.      As with our example we created our connection

1.       clip_image024

                                                            iv.      Then Click Ok Twice to get back.

                                                              v.      Then next to Source click on the Drop down and select the Variable that we populated in the previous steps.

                                                            vi.      As with our Example we are going to select the variable that we populated in step 5 above.

                                                           vii.      So once complete it will look like the following:

1.       clip_image025

                                                         viii.      Then Click Ok.

7.       Next we need to create our Update TSQL Statement for our Mart_TD_Max_SSAS_PartitionDetails table so that we can dynamically update this after the partition above has been created.

a.        Go into your variables and click on the ellipses button next to Query_Update_Mart_TD_Max_SSASPartitionDetails

b.       Then we put in the following for our Update Statement in the Expression Window:

“Update [dbo].[Mart_TD_Max_SSAS_PartitionDetails]

 Set         [YearOfLastPartition] = “+ @[User::YearForNextPartition]  +”

                                ,[MonthNameOfLastPartition] = ‘”+ @[User::MonthNameForNextPartition]   +”‘

                                ,[YearMonthOfLastPartition] = ‘”+ @[User::YearMonthForNextPartition]  +”‘

                                ,[DateTimeInsertedIntoTable] = getdate()

                                ,PartitionName = ‘Internet Sales “+ @[User::YearMonthForNextPartition]  +”‘

                                ,SSAS_DatabaseName = ‘Adventure Works'”

                                                               i.      Then click on Evaluate Expression to ensure that it is valid and you should see the following:

1.       clip_image026

c.        Then click Ok.

8.       The next part is to update our Mart_TD_Max_SSAS_PartitionDetails with our last Partition that was created in the steps above. This is so that we have a starting point for the next time this runs.

a.        Drag in an Execute SQL Task and give it the following name:

                                                               i.      Update Mart_TD_Max_SSAS_PartitionDetails with Last Partitions created

b.       Then configure it with the following:

                                                               i.      clip_image027

                                                              ii.      NOTE: The variable that we selected is called: Query_Update_Mart_TD_Max_SSASPartitionDetails

c.        Then click Ok

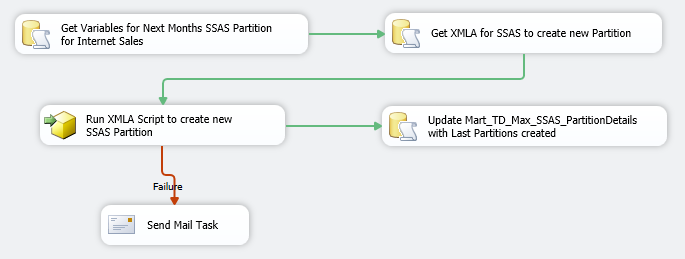
9.       Now the final part is where if the create partition script fails to then send an email so that the person responsible is made aware of the error.

a.        Drag in your Send Mail Task and drag it under your Run XMLA Script to create new SSAS Partition

b.       Drag the precedence constraint to your Send Mail Task and change it from success to failure.

                                                               i.      clip_image028

c.        Then configure your Send Mail Task as you require for the person responsible.

10.    So once complete it looks like the following:

a.        clip_image029

11.    Now that it is complete you can run the package.

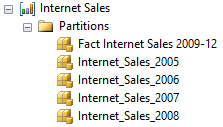
a.        So when we looked at our Partitions before we ran the package it looked like the following:

                                                               i.      clip_image030

                                                              ii.      NOTE: The reason for our Fact Internet Sales 2009-12 was so that we could create our script.

b.       Now after running the package it completes as shown below:

                                                               i.      clip_image031

c.        Now if we look at our Partitions again we will see the following after refreshing it:

                                                               i.      clip_image032

d.       And then finally if we look at our Mart_TD_Max_SSAS_PartitionDetails it should have the details of our Partition we created above:

                                                               i.      clip_image033


SSIS – Using SQL Server Analysis Services (SSAS) MDX query into Variable in Execute SQL Task

What I wanted to do was to get the output from my MDX query, and then use this in SSIS and take the output and put it into an SSIS Variable which could then be used later in your SSIS Package.


Example:

·         We are going to get the Internet Sales Amounts for 2 days.

o    01 June 2008 – $44,650.70

o    02 June 2008 – $35,496.03

·         Then we are going to put the two values into a variable.

·         Then we are going to use a Precedence constraint to compare the values, and if the Internet Sales amount is lower when compared then continue onto the next step.

o    So if the value on 02 June 2008 is lower than the value on 01 June 2008 continue to the next step.

o    So as from the above values it should continue onto the next step.

o    If the amount is higher then do not do anything.

·         NOTE: The reason that we are using an MDX query is so that we can get our data back as quickly as possible.


You can get a copy of this here: http://msftdbprodsamples.codeplex.com/releases/view/55330

·         I used the AdventureWorksDW2012 Data File and AdventureWorks Multidimensional Models SQL Server 2012


1.       The first thing that we are going to do below is get our MDX query which connects to the AdventureWorksDW2012 SSAS Cube.

a.        This query is for Internet Sales for 01 June 2008

Selectnonempty {[Measures].[Internet Sales Amount]} on 0

,nonempty {(

                     [Date].[Date].&[20080601]

                     )} on 1

from [Adventure Works]

                                                               i.       

b.       This query is for Internet Sales for 02 June 2008

Selectnonempty {[Measures].[Internet Sales Amount]} on 0

,nonempty {(

                     [Date].[Date].&[20080602]

                     )} on 1

from [Adventure Works]

                                                               i.       

2.       Now create your new SSIS Package.

3.       Next we will create our 2 variables that will be used to populate using the MDX queries above.

4.       Below is how we have created them:

a.        clip_image002[1]

b.       NOTE: We have created them as Int64 due to us getting back a numeric value.

                                                               i.      And this can also be compared in our Precedence Constraint

5.       Next we need to create an OLE DB Connection to our SSAS Cube by doing the following below:

a.        Right click in your Connection Managers section and select New OLE DB Connection

b.       When the window opens click on New

                                                               i.      Now from the drop down select the following:

1.       clip_image004[1]

2.       NOTE: You have to select the above so that we can connect to our SSAS Instance.

                                                              ii.      Now once configured you will see the following below:

1.       clip_image006[1]

                                                            iii.      If you want you can click on Test Connection to ensure that it can connect.

                                                            iv.      Then click Ok and then Ok again.

c.        You should now see the following in your Connection Managers Window:

                                                               i.      clip_image008[1]

                                                              ii.      NOTE: If required you can make this a Project Connection if your SSIS Project is in Project Deployment mode.

6.       Now what we are going to do is to assign our MDX Query to our variables using the Execute SQL Task.

7.       Drag in an Execute SQL Task and complete the following steps for One Day back

a.        As per our example I renamed the Execute SQL Task to the following:

Get Internet Sales Amount for One Day Back into Variable

b.       I went into the Execute SQL Task Properties and configured it with the following:

                                                               i.      clip_image010[1]

c.        We then selected our OLE DB connection that we created in step 5 above:

                                                               i.      clip_image012[1]

d.       Next under SQLStatement we are then using our MDX query from Step 1a above:

                                                               i.      clip_image014[1]

                                                              ii.      Then click Ok.

e.       Next click on the Result Set and click on Add

                                                               i.      Now where it says Result Name change this to the following:

[Measures].[Internet Sales Amount]

                                                              ii.      And then ensure that the Variable Name is:

User::InternetSales_OneDayBack

                                                            iii.      clip_image016[1]

f.         Then click Ok.

g.        Now right click and select Execute Task to test that the variable will be populated.

h.       clip_image018[1]

8.       Drag in an Execute SQL Task and complete the following steps for Two Days back

a.        As per our example I renamed the Execute SQL Task to the following:

Get Internet Sales Amount for Two Days Back into Variable

b.       I went into the Execute SQL Task Properties and configured it with the following:

                                                               i.      clip_image010[2]

c.        We then selected our OLE DB connection that we created in step 5 above:

                                                               i.      clip_image019[1]

d.       Next under SQLStatement we are then using our MDX query from Step 1b above:

                                                               i.      clip_image021[1]

                                                              ii.      Then click Ok.

e.       Next click on the Result Set and click on Add

                                                               i.      Now where it says Result Name change this to the following:

[Measures].[Internet Sales Amount]

                                                              ii.      And then ensure that the Variable Name is:

User::InternetSales_TwoDaysBack

                                                            iii.      clip_image023[1]

f.         Then click Ok.

g.        Now right click and select Execute Task to test that the variable will be populated.

h.       clip_image025[1]

9.       Now the final step is to have a next step to go to if the value is lower.

10.    For our example we are going to put the next step as a Send Mail Task

a.        So we dragged in the Send Mail Task and configured it so that it can send an email if run.

b.       Next we dragged the success precedence constraints as shown below:

c.        clip_image027[1]

d.       NOTE: The reason it was done in this order is so that we can get both variables populated before we change the constraint options.

e.       Now double click on the success precedence constraint that goes from Get Internet Sales Amount for Two Days Back into Variable to the Send Mail Task

                                                               i.      clip_image029[1]

f.         Now in the Precedence Constraint Editor Window complete the following:

                                                               i.      Change the Evaluation operation from Constraint to Expression

                                                              ii.      clip_image031[1]

g.        Then where it says Expression click on the Ellipses button.

h.       Now in order to check if the value is less to continue we put the following:

@[User::InternetSales_OneDayBack] <  @[User::InternetSales_TwoDaysBack]

                                                               i.      Click on Evaluate Expression to ensure that it is valid.

                                                              ii.      clip_image033[1]

i.         Then Click Ok and Ok again to go back to the Control Flow

11.    Now finally run your SSIS Package and it should complete with the following as shown below:

12.    clip_image035[1]

13.    NOTE: If you had to change your Precedence Constraint to the following below and re-run the above in order to test if the value was higher you would get the following result:

a.        clip_image037[1]