What happened is that I found that when doing inserts on larger data sets, it would take a long time to complete the date and time joins. If I excluded this the data would be returned a lot quicker.
So my solution to the problem was to use the Cache Transform and then the Loopkup Transform in the SSIS Data flow task. This enabled the query to be returned a lot quicker.
Example:
· We are first going to create our Cache Transform for our Date and Time
· Then we are going to insert data into our Fact table from the following Adventure Works table below using the Lookup Transformation
o dbo.FactInternetSales
· We will be using SSDT and SQL Server 2014
You can get a copy of this here: http://msftdbprodsamples.codeplex.com/releases/view/55330
· I used the AdventureWorksDW2012 Data File and AdventureWorks Multidimensional Models SQL Server 2012
Creating the Cache Transform for Date and Time
NOTE: We inserted a time table into the AdventureWorksDW2012 database, which has every minute for a day which will return 1440 rows.
NOTE II: You will only have to create the Date and Time Cache Transform once. Unless your Date table changes every time you load your data. This is because in the later steps you will see how you just select your file.
1. We will first start with setting up the Date Cache Transform.
a. Go into your SSIS and create a new SSIS Package.
b. Then drag in a data flow task, which we renamed to Date Cache Transform
c. Then double click to go into the Date Cache Transform data flow task.
d. Now in the SSIS Toolbox, drag in the ADO NET Source
i. NOTE: The reason we use the ADO NET Source, is because it is better at getting the correct Data Types for our Cache Transform.
e. We then configured it with the following as shown below
ii. NOTE: The reason that we converted our FullDateAlternateKey to Date, is because when we do our lookup later, we want it to have JUST the Date Data Type
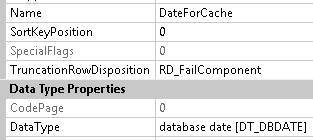
f. If we went into the Advanced Editor for the ADO NET Source, we can verify that the FullDate is the Data type of “Database Date”
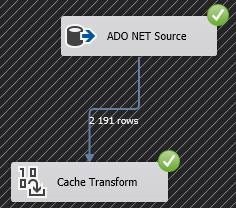
g. Now in the SSIS Toolbox, click under Other Transformations and drag in the Cache Transform
h. Then drag the blue constraint to your Cache Transform.
i. Then double click your Cache Transform to go into the Properties
j. Now when it opens you will see that there is no Connection Manager. Click on New…
k. This will then open the Cache Connection Manager Editor
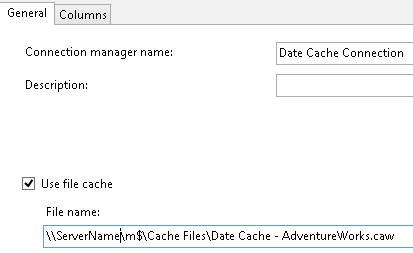
l. We then configured it as shown below:
ii. As you can see above we put in the name.
iii. Then we also selected to Use file cache.
1. Then we configured the File name with a UNC
2. NOTE: The reason that we did this is so that if you execute this package from another location it will still find the location.
3. NOTE II: You must ensure that the account running the SSIS job has access to the folder location and file on the server.
m. Then click on Columns. This is where you will configure which column will be used for the actual lookup.
i. In our example we want to do the lookup on the FullDate, so next to FullDate we will put the Index Position of 1
ii. NOTE: You can have more than one lookup, and each additional Index Position will increment in number.
n. Then click Ok to go back to the Cache Transformation Editor.
o. Now click on the Mappings in the left hand side
p. You should now see the following:
r. NOTE: From above you can see because we created the Index Position of 1 for the FullDate, it has got the magnifying glass. Which represents that this can be used in the Lookup later.
s. Click Ok.
t. You can now run this data flow task to populate your Date Cache Transform.
2. Next will be setting up the Date Cache Transform.
a. Go into your SSIS and create a new SSIS Package.
b. Then drag in a data flow task, which we renamed to Time Cache Transform
c. Then double click to go into the Time Cache Transform data flow task.
d. Now in the SSIS Toolbox, drag in the ADO NET Source
i. NOTE: The reason we use the ADO NET Source, is because it is better at getting the correct Data Types for our Cache Transform.
e. We then configured it with the following as shown below
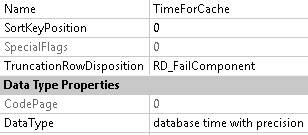
f. If we went into the Advanced Editor for the ADO NET Source, we can verify that the Time is the Data type of “database time with precision”
g. Now in the SSIS Toolbox, click under Other Transformations and drag in the Cache Transform
h. Then drag the blue constraint to your Cache Transform.
i. Then double click your Cache Transform to go into the Properties
j. Now when it opens you will see that there is no Connection Manager. Click on New…
k. This will then open the Cache Connection Manager Editor
l. We then configured it as shown below:
ii. As you can see above we put in the name.
iii. Then we also selected to Use file cache.
1. Then we configured the File name with a UNC
2. NOTE: The reason that we did this is so that if you execute this package from another location it will still find the location.
3. NOTE II: You must ensure that the account running the SSIS job has access to the folder location and file on the server.
m. Then click on Columns. This is where you will configure which column will be used for the actual lookup.
i. In our example we want to do the lookup on the Time, so next to Time we will put the Index Position of 1
ii. NOTE: You can have more than one lookup, and each additional Index Position will increment in number.
n. Then click Ok to go back to the Cache Transformation Editor.
o. Now click on the Mappings in the left hand side
p. You should now see the following:
r. NOTE: From above you can see because we created the Index Position of 1 for the Time, it has got the magnifying glass. Which represents that this can be used in the Lookup later.
s. Click Ok.
t. You can now run this data flow task to populate your Time Cache Transform.
3. Now if you are using SSIS 2012 or 2014, we will convert the Date and Time Cache Connections to Project connections.
a. This is so that later we can select them from our other SSIS Packages.
b. Right click on each Cache Connection Manager and select Convert to Project Connection
c. They will now look like the following in the Connection Managers
Creating your TSQL Query so that it can be used for the Lookup Transformation
In the steps below we need to ensure that we create the correct data types in our TSQL Query so that when we do the lookup it will map correctly.
NOTE: If the data types within SSIS are not an exact match between your TSQL Query and the Lookup Transformation it will not allow you to create the mapping.
1. Below is the TSQL Example from our dbo.FactInternetSales table.
SELECTTOP 1000 [ProductKey]
,[OrderDateKey]
,[DueDateKey]
,[ShipDateKey]
,[CustomerKey]
,[PromotionKey]
,[CurrencyKey]
,[SalesTerritoryKey]
,[SalesOrderNumber]
,[SalesOrderLineNumber]
,[RevisionNumber]
,[OrderQuantity]
,[UnitPrice]
,[ExtendedAmount]
,[UnitPriceDiscountPct]
,[DiscountAmount]
,[ProductStandardCost]
,[TotalProductCost]
,[SalesAmount]
,[TaxAmt]
,[Freight]
,[CarrierTrackingNumber]
,[CustomerPONumber]
,[OrderDate]
,[DueDate]
,[ShipDate]
,[DistinctCustomers]
,Convert(date,[OrderDate])as DateForCache
,Cast(convert(varchar(5),convert(time(0),[OrderDate]))+‘:00’asTime(0))as TimeForCache
FROM [AdventureWorksDW2012].[dbo].[FactInternetSales] with (nolock)
2. As you can see above we have converted out OrderDate to the Date data type.
3. We have also converted our OrderDate to only show use the Time, using the data type of Time(0)
a. NOTE: If this is not done in this way, when the time goes over 12pm it would then display it was 01pm instead of 13:00
4. Now we can use the above query in our data flow task to Insert into our fact table.
Using the Lookup Transformation for inserting data into our Fact table
Below we will now use our TSQL Query, as well as our Lookups to our Date and Time Cache Transform
1. Go into SSIS, and go to your SSIS Package where you want to insert your data into the Fact table.
2. Then drag in your data flow task.
a. If needed rename your data flow task.
3. Now drag in an ADO NET Source.
a. NOTE: The reason for the ADO NET Source is so that it will get the correct data types from our query.
b. I have found in the past that the OLE DB Source at times does not find the correct data types for the Lookup Transform.
4. We then put in the query from step 1 in the section above.
a. NOTE: We went into the Advanced Editor to ensure that the Date Types for the DateForCache and TimeForCache columns are correct.
5. Now we need to create our first lookup for our Date Cache Transform.
a. In the SSIS Toolbox drag in the Lookup under the Common section
b. We then renamed the Lookup to Date Lookup
c. Then drag the Blue constraint to our Date Lookup.
d. Double click on the Date Lookup to go into the Properties
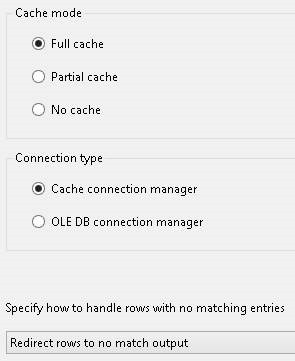
e. On the General section we configured it with the following:
ii. NOTE: The reason we chose the Cache Connection Manager is so that we can use the cache file we created earlier.
f. Then click on the Connection.
g. If you configured your Date and Time Cache Connections as Project Connections you will see them in the Cache Connection Manager
i. Click on the drop down and select Date Cache Connection
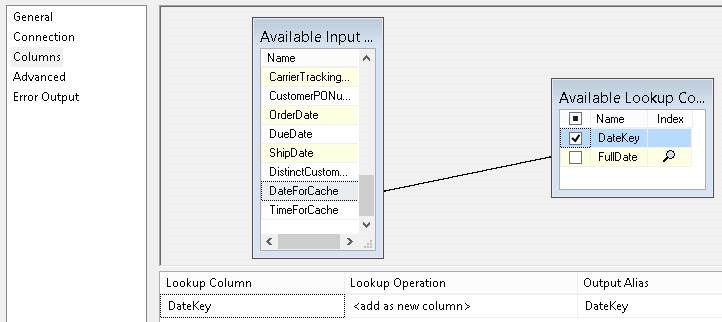
h. Then click on Columns, and we configured it with the following:
j. As you can see above we have used our Input column which was DateForCache, and then mapped it to our Lookup Column called FullDate which we configured earlier.
k. We then selected the DateKey as our Output Alias
l. Then click Ok.
6. Next we configured our lookup for our Time Cache Transform.
a. In the SSIS Toolbox drag in the Lookup under the Common section
b. We then renamed the Lookup to Time Lookup
c. Then drag the Blue constraint to our Time Lookup.
d. When you do this it will pop up with the Input Output selection window
i. For the Output select the Lookup Match Output
iii. Click Ok.
e. Double click on the Time Lookup to go into the Properties
f. On the General section we configured it with the following:
ii. NOTE: The reason we chose the Cache Connection Manager is so that we can use the cache file we created earlier.
g. Then click on the Connection.
h. If you configured your Date and Time Cache Connections as Project Connections you will see them in the Cache Connection Manager
i. Click on the drop down and select Time Cache Connection
i. Then click on Columns, and we configured it with the following:
k. As you can see above we have used our Input column which was TimeForCache, and then mapped it to our Lookup Column called Time which we configured earlier.
l. We then selected theTimeKey as our Output Alias
m. Then click Ok.
7. Now finally drag in your ADO NET Destination.
a. Drag the blue constraint to your ADO NET Destination.
b. When you do this it will pop up with the Input Output selection window
i. For the Output select the Lookup Match Output
iii. Click Ok.
c. Then go into our ADO NET Destination Properties and select your destination Fact table.
d. And then ensure that your mappings are correct.
e. If you scroll to the bottom you should see the mappings from your Lookups above to your Fact Table
8. Then finally run your SSIS Package and you should see the following:






![clip_image006[1] clip_image006[1]](https://gqbi.files.wordpress.com/2014/07/clip_image0061_thumb.jpg?w=134&h=64)




![clip_image039[1] clip_image039[1]](https://gqbi.files.wordpress.com/2014/07/clip_image0391_thumb.jpg?w=140&h=122)

![clip_image041[1] clip_image041[1]](https://gqbi.files.wordpress.com/2014/07/clip_image0411_thumb.jpg?w=295&h=361)


